Now onto the swap: Interior
Disconnect negative terminal on battery:
I started by stripping the interior, remove the rear section of the center console 1st, then the driver's
side under dash panel, along with the metal support panel & H VAC duct. Then remove entire glove
box with under panel. Now you can remove the front portion of the center console!
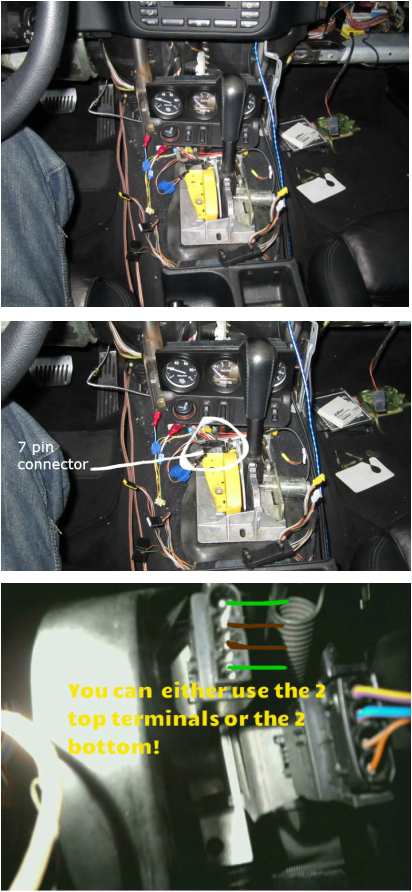
I removed the automatic brake pedal assembly, 4 nuts on the base plate & clips on brake cylinder rod. Disassemble the automatic gear selector & locate the 7 pin connector which you will later to splice in your reverse lights, neutral safety switch, & cruise!
Clutch safety switch/cruise control/starter fix:
Just a little note for you 96'-98 328i owners, I tried this using the Blue/Black wire with the Brown/Black wire & it did not work...
Looking at the Bentley wiring diagrams, up to 94' the Brown/Black (Cruise Control wire) splits to the starter relay. It does not on the 95' 325i & 96'-98' 328's.
So, scoping through the Bentley, I found that Green/Gray #5 wire splits to the ignition, Hot in run & start, when I jumped the Green/Gray #5 wire with the #7 Brown/Black wire off the 7 pin harness, my car started...I spliced in with the extra Black Brake switch in place of the White Clutch switch & this all worked!
Note: You will see the brake switch won't fit directly into the clutch pedal bracket. This is because it has a small tab that stops it from going in. This was designed so you couldn't put them in backwards (the brake and clutch safety switches.) You simply used a utility knife to cut the little tab off so it would snap right into the bracket.
Run the Green/Gray #5 & the Brown/Black #7 wires to either the 2 top terminals or the 2 bottom terminals onto the extra brake switch shown in the picture to the left!
Reverse Light Procedure:

Then using the 2 prong connector from the Automatic harness splice about 2 feet of wire into the existing wiring, for the reverse switch & then splice in with the blue with yellow stripe and the green with white stripe wires from the 7 pin harness, for your reverse lights!
Note: the Reverse Light procedure is the same... blue with yellow stripe and the green with white stripe wires!
Note: the Reverse Light procedure is the same... blue with yellow stripe and the green with white stripe wires!
Automatic Transmission Computer Procedure:
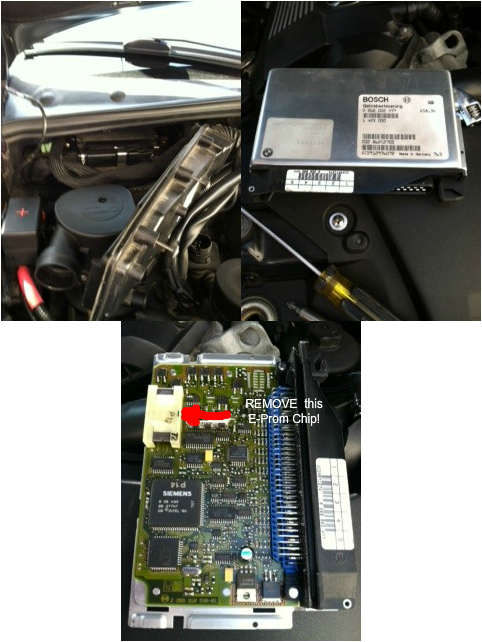
At this point with the battery still disconnected, I removed the Automatic trans computer, it's the smaller of the 2. I removed the E-prom chip & then reinstalled the computer!
Clutch Pedal Slot:
With a razor blade & cutting sheers, I cut the slot out of the driver's side under panel for the clutch pedal.
It was simple, just follow the outline!
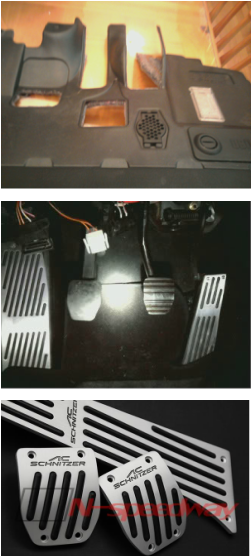
Clutch & Brake pedal assembly installation:
As for the clutch & brake pedal assembly installation, I had to wing it, with the use of my Bentley Repair Manual & different links that I will list below:
Remove the 4 mounting nuts on Automatic's brake pedal assembly along with the existing brake booster rod clip & brake switch connector! Install clutch/brake pedal assembly in reverse order... Bentley Service Manual, definitely helpful...here!
http://www.realoem.com/bmw/partgrp.do?model=CD33&mospid=47501&hg=35&fg=05
Pick these AC Schnitzer replicas up for $30.00 on eBay Motors...
It was simple, just follow the outline!
Clutch & Brake pedal assembly installation:
As for the clutch & brake pedal assembly installation, I had to wing it, with the use of my Bentley Repair Manual & different links that I will list below:
Remove the 4 mounting nuts on Automatic's brake pedal assembly along with the existing brake booster rod clip & brake switch connector! Install clutch/brake pedal assembly in reverse order... Bentley Service Manual, definitely helpful...here!
http://www.realoem.com/bmw/partgrp.do?model=CD33&mospid=47501&hg=35&fg=05
Pick these AC Schnitzer replicas up for $30.00 on eBay Motors...
